What it changes
What PhotoGIMP changes in GIMP, file by file
We unpacked PhotoGIMP 3.1, compared every file with what a fresh GIMP 3.2.6 writes, and installed it on three systems. This is the complete list of what changes, and what does not.
On this page 11 sections
Short answer
In one paragraph
PhotoGIMP is 31 settings files. They give GIMP a Photoshop-style toolbox (one column, Photoshop’s order), new keys for 29 commands (23 of them Photoshop’s), a single-window layout with Tool Options, Brushes and Layers docked on the right, a handful of preferences (larger layer previews, at least 8 undo steps, transparency added to opened images, a dark canvas border) and a splash screen. On Linux it can also add a “PhotoGIMP” launcher and icon. It does not change GIMP’s program files, add features or plug-ins, or touch your images.
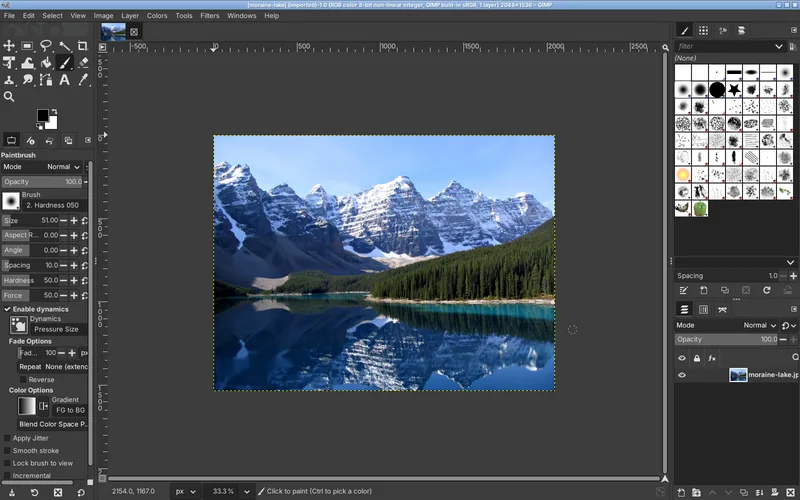
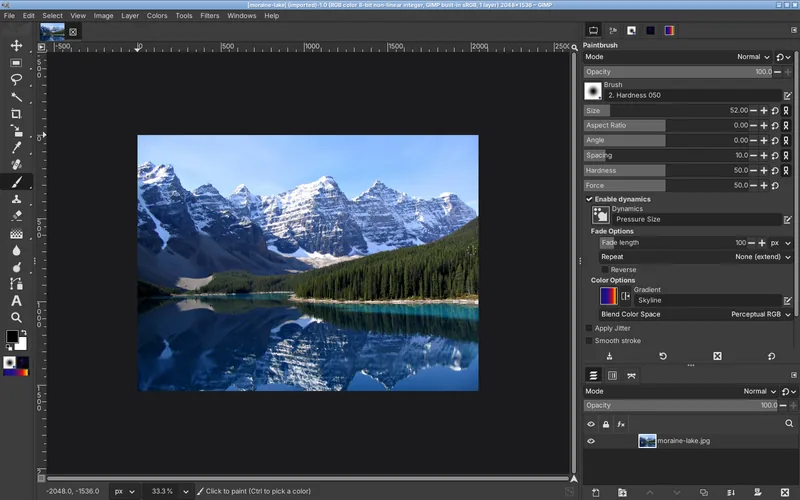
1. The toolbox: one column, Photoshop’s order
File: toolrc. Stock GIMP 3.2.6 shows its tools as a grid of groups. PhotoGIMP lists them as one column in the order of Photoshop’s toolbar. Compared with stock GIMP it moves the Color Picker up next to Crop (where Photoshop has the Eyedropper), gives Healing its own slot, shows Scale for the transform group and Gradient instead of Bucket Fill, splits Blur/Sharpen from Smudge, and hides the Warp and Cage group.
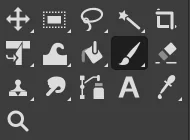

Stock GIMP 3.2.6
- Move + Align and Distribute
- Rectangle Select + Ellipse Select
- Free Select + Scissors Select, Foreground Select
- Fuzzy Select + Select by Color
- Crop
- Unified Transform + Rotate, Scale, Shear, Flip, Perspective, 3D Transform, Handle Transform
- Warp Transform + Cage Transform
- Bucket Fill + Gradient
- Paintbrush + Pencil, Airbrush, Ink, MyPaint Brush
- Eraser
- Clone + Perspective Clone, Healing
- Smudge + Blur / Sharpen, Dodge / Burn
- Paths
- Text
- Color Picker + Measure
- Zoom
PhotoGIMP 3.1
- Move + Align and Distribute
- Rectangle Select + Ellipse Select
- Free Select + Scissors Select, Foreground Select
- Fuzzy Select + Select by Color
- Crop
- Scale + Unified Transform, Rotate, Shear, Flip, Perspective, 3D Transform, Handle Transform
- Color Picker + Measure
- Healing
- Paintbrush + Pencil, Airbrush, Ink, MyPaint Brush
- Clone + Perspective Clone
- Eraser
- Gradient + Bucket Fill
- Blur / Sharpen
- Dodge / Burn + Smudge
- Paths + gimp-vector-tool
- Text
- Zoom
Each entry is a tool group: click and hold (or right-click) a toolbox icon to reach the others in its group. On GIMP 3.2 this file needs the Paths rename, or GIMP ignores it.
2. Keyboard shortcuts
File: shortcutsrc. The 3.1 file has 39 entries. On GIMP 3.2.6 they give 29 commands a new key (23 of them Photoshop’s) and take the key away from 12 others. Tool letters follow Photoshop (V, M, L, W, C, I, J, B, S, E, G, O; T and Z already matched), and so do Ctrl+J, Ctrl+T, Ctrl+D, Ctrl+0, image and canvas size, fills and brush hardness ({ }). Brush size on [ ] is already GIMP’s default. The Paths tool gets P only on master; in 3.1 it has no key. Everything else keeps GIMP’s default. Full list and live keyboard.
3. The window layout
File: sessionrc. It keeps single-window mode on ((single-window-mode yes), which is also GIMP 3.2’s default), so images open as tabs in one window like Photoshop’s documents, and sets up the docks:
- Left: the toolbox, 66 pixels wide (one column).
- Right, top: Tool Options, Fonts, Brushes, Patterns and Gradients as tabs.
- Right, bottom: Layers, Channels and Paths as tabs, with 32-pixel previews.
It also stores window positions and sizes from the computer the files were made on (a large screen: the main window at 1888×1011, Preferences 1746×896, Keyboard Shortcuts 1417×1416). On smaller screens some dialogs open partly off-screen; the fix.
4. Preferences
File: gimprc. Every setting PhotoGIMP changes, next to GIMP 3.2.6’s own default (read from gimp --dump-gimprc):
| Setting | PhotoGIMP | GIMP 3.2.6 default | What you notice |
|---|---|---|---|
Interface languagelanguage | (not set) | Empty means “use the system language”. | |
Config format versionconfig-version | 3.0.0 | (not set) | Written by GIMP 3.0. GIMP 3.2 sees an older profile and shows its welcome screen once. |
Minimal undo levelsundo-levels | 8 | 5 | GIMP always keeps at least this many undo steps (it keeps more while the undo memory limit allows). |
Undo History preview sizeundo-preview-size | medium | large | Smaller thumbnails in the Undo History dock. |
Layer preview sizelayer-preview-size | extra-large | medium | Bigger layer thumbnails, closer to Photoshop’s Layers panel. |
Add an alpha channel to imported imagesimport-add-alpha | yes | no | Opened images get transparency right away, like a Photoshop layer, so erasing gives transparency instead of the background color. |
Thumbnail sizethumbnail-size | large | normal | Bigger previews in the Open dialog. |
Raw image importerimport-raw-plug-in | ${gimp_plug_in_dir}/plug-ins/file-raw-placeholder/file-ra… | (empty) | Points at GIMP’s placeholder, so raw files open with whatever raw processor you have installed (darktable or RawTherapee). |
Monitor resolution (horizontal)monitor-xresolution | 140 | 96 | 140 ppi instead of 96. GIMP uses it only when “dot for dot” is off and it is told not to take the resolution from the system, which it does by default; so usually no effect. |
Monitor resolution (vertical)monitor-yresolution | 140 | 96 | As above. |
Show layer boundarydefault-view.show-layer-boundary | no | yes | Hides the yellow dashed line around the active layer. |
Show canvas boundarydefault-view.show-canvas-boundary | no | yes | Hides the canvas outline. |
Snap to canvas edgesdefault-view.snap-to-canvas | yes | no | Moving things snaps to the canvas edges, like Photoshop’s snapping. |
Canvas padding modedefault-view.padding-mode | custom | default | Uses a custom color around the image. |
Full screen: show layer boundarydefault-fullscreen-view.show-layer-boundary | no | yes | Same as above, in full-screen mode. |
Full screen: show canvas boundarydefault-fullscreen-view.show-canvas-boundary | no | yes | Same as above, in full-screen mode. |
Full screen: snap to canvas edgesdefault-fullscreen-view.snap-to-canvas | yes | no | Same as above, in full-screen mode. |
Full screen: padding modedefault-fullscreen-view.padding-mode | custom | default | Same as above, in full-screen mode. |
Brush, pattern and gradient area in the toolboxtoolbox-foo-area | yes | no | Shows the current brush, pattern and gradient under the colors, as in the screenshots. |
Canvas padding colordefault-view.padding-color | custom, rgb(27, 27, 31) | from the theme (dark grey in the default dark theme) | A dark grey around the image, like Photoshop’s pasteboard. |
Full screen: padding colordefault-fullscreen-view.padding-color | custom, rgb(27, 27, 31), stored with an embedded ICC disp… | theme default | Same dark grey, in full-screen mode. |
Two of these you will notice right away: opened JPEGs get an alpha channel (the Layers panel shows them with transparency support, and the eraser makes holes instead of painting the background color), and the canvas around the image is dark grey instead of the theme color.
5. Starting tool, brush and tool options
Files: contextrc and the 18 files in tool-options/. GIMP starts with the Rectangle Select tool and the “2. Hardness 050” brush with Pressure Size dynamics. The Paintbrush and Eraser start at size 52 and hardness 0.5, the Crop tool’s fixed aspect ratio is preset to 1920:1080 (it only applies when you tick “Fixed”), and Scale uses linear interpolation. These are starting values; GIMP saves your own as you work.
6. The splash screen
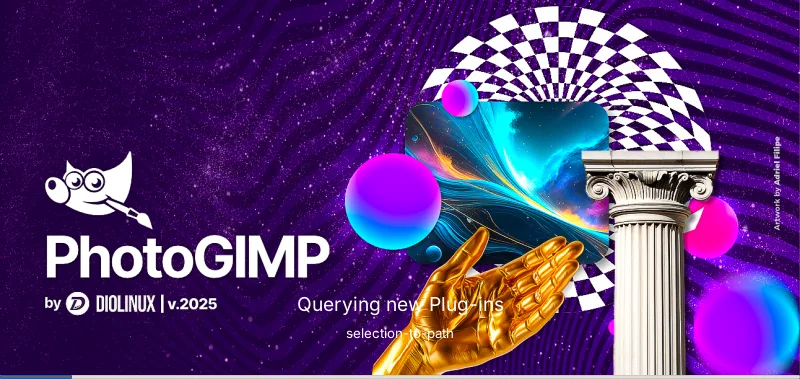
File: splashes/splash-screen-2025-v2.png. GIMP shows a random image from this folder while it loads, so with PhotoGIMP you see this instead of GIMP’s artwork. Artwork by Adriel Filipe Design.
7. Leftovers in the files
A few files are ordinary GIMP files that were exported along with the rest. They are harmless but explain some details:
theme.cssis regenerated by GIMP at every start. PhotoGIMP’s copy points at a Flatpak GIMP 3.0 and the dark theme on the machine it came from; GIMP replaces it with its own the first time it starts.plug-in-settings/holds the last-used options of the JPEG and PNG import/export dialogs and the unit editor;filters/holds one Brightness-Contrast preset.gimprccontains(config-version "3.0.0"), which makes GIMP 3.2 show its welcome screen (usually once), and an embedded display color profile in the full-screen canvas color, from the monitor the configuration was made on.
8. Linux extras
PhotoGIMP-linux.zip adds two things outside GIMP’s settings folder, used with the Flatpak GIMP:
Name=PhotoGIMP
Icon=photogimp
Exec=flatpak run --branch=stable --command=gimp --file-forwarding org.gimp.GIMP @@u %U @@
Because the file has the same name as the Flatpak’s own launcher, it replaces GIMP’s menu entry: GIMP appears as “PhotoGIMP” with the PhotoGIMP icon (photogimp.png in 16, 32, 48, 64, 128 and 512 pixels under ~/.local/share/icons/hicolor/, plus two stray copies the zip also contains). On Windows, the release offers photogimp.ico for the same purpose; you set it on the shortcut yourself.
All files
| File in 3.1 | Size | What it does |
|---|---|---|
contextrc | 304 B | The active tool, colors, brush and other context on startup. |
filters/ | 161 B | A saved Brightness-Contrast preset. |
gimprc | 5.0 KB | General preferences: undo levels, previews, import behaviour, default view options. |
plug-in-settings/ (5 files) | 945 B | Last-used settings of the JPEG/PNG import and export dialogs and the unit editor. |
sessionrc | 3.2 KB | Window and dock layout: single-window mode, panel positions and sizes. |
shortcutsrc | 42.0 KB | Keyboard shortcuts, remapped to Photoshop’s Windows defaults. |
splashes/ | 1.47 MB | The PhotoGIMP splash screen shown while GIMP starts. |
theme.css | 454 B | A theme file GIMP writes itself; GIMP replaces it at every start. |
tool-options/ (18 files) | 3.1 KB | Saved options for individual tools (brush size, hardness, crop and text settings). |
toolrc | 5.9 KB | Toolbox order and tool groups, arranged like Photoshop’s toolbar. |
What PhotoGIMP does not change
- GIMP’s program, menus, filters and tools: the same GIMP 3.2.6, only rearranged.
- Features: no content-aware fill, adjustment layers, smart objects, generative AI or new file formats.
- Plug-ins: none included (the 2020 releases had Linux-only Resynthesizer binaries; PhotoGIMP 3 has none).
- Your brushes, fonts, palettes, patterns, scripts and plug-ins.
- The menu names: GIMP’s menus stay GIMP’s (Colors, not Image → Adjustments).
- Anything outside GIMP’s settings folder, except the optional Linux launcher and icons.
Questions
Does PhotoGIMP change GIMP’s theme or icons?
Does PhotoGIMP change the menus to Photoshop’s?
Can I use only part of PhotoGIMP?
Why do opened images have an alpha channel?
Keep going
Found something wrong or out of date? Tell us: hello@photogimp.org. We fix mistakes within a day.